스프링이란?
스프링은 Rod Johnson이 2002년도에 발표한 ‘Expert One-on-One J2EE Design and Development’ 라는 책에서 발표한 Java 진영의 Framework입니다. 현재 한국 web진영에서 가장 많이 사용한다고 해도 과언이 아닐 정도인데요. Spring은 POJO(plain old Java objects) 기반으로 application을 작성할 수 있도록 도와줍니다. Spring doc 에는 다음과 같은 문장이 있습니다.
Make a Java method execute in a database transaction without having to deal with transaction APIs.
Make a local Java method a remote procedure without having to deal with remote APIs.
Make a local Java method a management operation without having to deal with JMX APIs.
Make a local Java method a message handler without having to deal with JMS APIs.
뭐 .. 대충 transaction APIs , remote API … 등등 을 사용하지 않고 java application을 작성할 수 있도록 도와준다는 것 같습니다. 그리고 이게 바로 위에서 언급한 POJO이기도 하구요.
저는 스프링을 배울때 3.x 대 부터 사용했었는데 현재 19.03.18 기준으로 mvn repository에 5.1.5 버전이 release 되었네요. 당시에 저도 처음 배울때는 Spring 하면 Web을 가장 먼저 떠올렸었는데 그 외에도 Spring Batch, Spring Cloud 등등 … 아주 많은 곳에서 Spring을 사용하고 있습니다.
Spring 하면 대표적으로 떠오르는게 바로 Dependency Injection / Inversion of Control 인데요. 이제 본격적으로 DI/IoC , Spring Architecture 를 한번 파헤치는 시간을 가졌으면 좋겠어요! (저도 공부 할 겸 …)
Spring Architecture

Spring 공부하시는 분들은 많이 보셨을만한 그림인데요. Data Access 부터 Web, Core Container 등 다양하게 많습니다. 차근히 알아볼께요!
Dependency Injection / Inversion of Control
제가 생각하는 Spring core의 핵심! 바로 DI/IoC 인데요 사실 스프링 doc을 읽어봐도 DI/IoC 개념이 확 와닿지 않았어요. (저는..) DI/IoC를 그대로 직역하면 DI는 ‘의존성 주입 ‘, IoC는 ‘제어의 역행’ 인데요. DI는 무언가에 의존되어 주입이 되는거고 IoC는 말그대로 제어의 역행을 뜻합니다.
제어의 역행을 설명드리면 보통 Java에서 객체를 생성할때 new라는 예약어를 사용해서 객체를 생성하게 되잖아요? 근데 보통 이 new라는 예약어는 개발자가 소스코드에서 직접 선언을 하게 됩니다. 즉 객체를 관리하는 주체가 개발자가 되어요. 만약 개발자가 실수 또는 잘못된 습관으로 A 라는 객체를 두번 생성했다거나 굉장히 큰 프로젝트에서 A라는 객체를 수정해야 할 때, 어디서 A라는 객체를 생성했는지 전부 디버깅해서 하나하나 씩 바꿔주어야 하는 상황이 발생하죠.
이런 문제를 개선할 수 있는게 바로 IoC 인데요. Spring에서는 더이상 new 연산자로 객체를 생성하지 않습니다. 바로 이 객체의 생성을 Spring에게 전가시키는건데요. 이것도 생각보다 간단해요. Spring Project가 컴파일러에 의해 Runtime시점으로 들어가기 이전에 Spring은 IoC Container를 통해서 Spring에 사용할 객체들을 초기화시키는 작업을 합니다. 즉 A라는 객체를 Spring Bean에 등록하고 A라는 객체를 사용할때는 IoC Container에서 A라는 객체를 주입시켜서 사용하는건데요. 여기서 말하는 주입이 바로 DI의 개념입니다. (Spring에서 Bean이라는 용어는 객체를 설명하고 있어요)
Spring DI/IoC 관련해서 옛날에 봤던 동영상인데 저는 아주 좋게 본 기억이 있어서 같이 공유하고 싶어요
출처 : https://www.youtube.com/watch?v=EERvVf9lNRs
Spring DI/IoC를 예제로 아주 훌륭하게 설명해주셨는데 대충 요약해서 설명드리면
“마찬가지로 개발자는 더이상 new 연산자를 사용하지 않고 객체의 생성을 Spring에게 전가시킨다. 이게 IoC, 그리고 Spring Container에서 객체들을 주입받아 사용하는게 바로 DI”
Spring IoC Container를 초기화 시키고 DI를 구현하는 방법은 크게 xml방식, Java Config 방식이 있는데 과거에는 xml방식을 많이 사용했지만 최근에는 Spring Boot에서 Java Config 방식을 지향하고 있기 때문에 유지보수와 신규개발을 동시에 하려면 둘 다 알아야 겠지요..
Example (Spring boot 2.1.3)
- pom.xml
	<dependencies>
		<dependency>
			<groupId>org.springframework.boot</groupId>
			<artifactId>spring-boot-starter</artifactId>
		</dependency>

		<dependency>
			<groupId>org.springframework.boot</groupId>
			<artifactId>spring-boot-starter-test</artifactId>
			<scope>test</scope>
		</dependency>

		<dependency>
		    <groupId>org.springframework.boot</groupId>
		    <artifactId>spring-boot-starter-web</artifactId>
		</dependency>
	</dependencies>
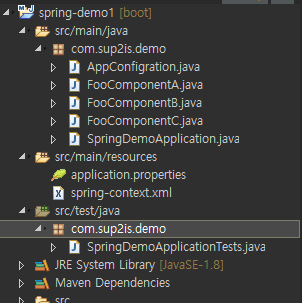
- package 구조
- SpringDemoApplication.class
package com.sup2is.demo;

import org.springframework.boot.SpringApplication;
import org.springframework.boot.autoconfigure.SpringBootApplication;
import org.springframework.context.annotation.ImportResource;

//@SpringBootApplication 은 @ComponentScan 을 포함하기 때문에 package 기반으로 Bean을 Scan해줍니다.
@SpringBootApplication
//Spring이 Bean을 초기화할때 xml이 어디있는지 모르니 반드시 명시해줘야 xml방식으로 Bean이 올라가요
@ImportResource({"classpath:spring-context.xml"})

public class SpringDemoApplication {

    public static void main(String[] args) {
        SpringApplication.run(SpringDemoApplication.class, args);
    }

}
- Java Config 방식
Spring Bean으로 등록하는 어노테이션은 여러개가 있지만 그중 몇가지만 살펴 볼께요.
- FooComponentA.class
package com.sup2is.demo;

import org.springframework.stereotype.Component;

@Component //Spring이 Bean을 초기화 할 때 @Component 가 붙은 클래스를 확인하고 해당 클래스를 Bean으로 등록
public class FooComponentA {

	public void print() {
		System.out.println(FooComponentA.class.getSimpleName() + " : hello world");
	}

}
- AppConfigration.class
package com.sup2is.demo;

import org.springframework.context.annotation.Bean;
import org.springframework.context.annotation.Configuration;

@Configuration //마찬가지로 Spring이 Bean을 초기화 할 때 @Configuration 붙은 클래스를 확인
public class AppConfigration {

	@Bean  //@Configuration 밑에 @Bean 어노테이션도 Spring Bean으로 등록
	public FooComponentB componentB() {
		return new FooComponentB();
	}

}
- FooComponentB.class
package com.sup2is.demo;

public class FooComponentB {

	public void print() {
		System.out.println(FooComponentB.class.getSimpleName() + " : hello world");
	}
}- .xml 방식
- spring-context.xml
<?xml version="1.0" encoding="UTF-8"?>
<beans xmlns="http://www.springframework.org/schema/beans"
	xmlns:xsi="http://www.w3.org/2001/XMLSchema-instance" xmlns:context="http://www.springframework.org/schema/context"
	xsi:schemaLocation="http://www.springframework.org/schema/beans
        http://www.springframework.org/schema/beans/spring-beans.xsd
        http://www.springframework.org/schema/context
        http://www.springframework.org/schema/context/spring-context.xsd">

	<bean id="fooComponentC" class="com.sup2is.demo.FooComponentC" /> <!--Spring Bean으로 등록-->

</beans>
- FooComponent.class
package com.sup2is.demo;

public class FooComponentC {

	public void print() {
		System.out.println(FooComponentC.class.getSimpleName() + " : hello world");
	}

}
xml로 등록하는 방식중에는 크게 두가지로 나뉘는데 하는김에 Construcure 주입과 Setter 주입도 한번 알아볼께요.
- .xml 방식 (Constructure)
- spring-context.xml
<?xml version="1.0" encoding="UTF-8"?>
<beans xmlns="http://www.springframework.org/schema/beans"
	xmlns:xsi="http://www.w3.org/2001/XMLSchema-instance" xmlns:context="http://www.springframework.org/schema/context"
	xsi:schemaLocation="http://www.springframework.org/schema/beans
        http://www.springframework.org/schema/beans/spring-beans.xsd
        http://www.springframework.org/schema/context
        http://www.springframework.org/schema/context/spring-context.xsd">

	<!-- <bean id="fooComponentC" class="com.sup2is.demo.FooComponentC"/> --> <!--Spring Bean으로 등록-->


    <!-- FooComponentC 를 Spring Bean에 등록할 때 name이란 field를 생성자로 초기화-->
	<bean id="fooComponentC" class="com.sup2is.demo.FooComponentC">
		<constructor-arg name="name" value="sup2is demo project"></constructor-arg>
    </bean>


</beans>
- FooComponentC.class
package com.sup2is.demo;

public class FooComponentC {

	private String name;

    //생성자로 초기화
	public FooComponentC(String name) {
		this.name = name;
	}

	public void print() {
		System.out.println(FooComponentC.class.getSimpleName() + " : hello world");
	}

	public void printName() {
		System.out.println("my name is " + name);
	}

}
- .xml 방식 (Setter)
- spring-context.xml
<?xml version="1.0" encoding="UTF-8"?>
<beans xmlns="http://www.springframework.org/schema/beans"
	xmlns:xsi="http://www.w3.org/2001/XMLSchema-instance" xmlns:context="http://www.springframework.org/schema/context"
	xsi:schemaLocation="http://www.springframework.org/schema/beans
        http://www.springframework.org/schema/beans/spring-beans.xsd
        http://www.springframework.org/schema/context
        http://www.springframework.org/schema/context/spring-context.xsd">

	<!-- <bean id="fooComponentC" class="com.sup2is.demo.FooComponentC"/> --> <!--Spring Bean으로 등록-->

	<!-- FooComponentC 를 Spring Bean에 등록할 때 name이란 field를 생성자로 초기화-->
	<!-- <bean id="fooComponentC" class="com.sup2is.demo.FooComponentC">
		<constructor-arg name="name" value="sup2is demo project"></constructor-arg>
	</bean>
	 -->

    <!-- FooComponentC 를 Spring Bean에 등록할 때 name이란 field를 setter 메서드로 초기화-->
	<bean id="fooComponentC" class="com.sup2is.demo.FooComponentC">
		<property name="name" value="sup2is demo project"></property>
	</bean>


</beans>
- FooComponentC.class
package com.sup2is.demo;

public class FooComponentC {

	private String name;

    //setter 메서드로 초기화
	public void setName(String name) {
		this.name = name;
	}

	public void print() {
		System.out.println(FooComponentC.class.getSimpleName() + " : hello world");
	}

	public void printName() {
		System.out.println("my name is " + name);
	}

}
- 테스트
그런데 지금 등록한 이 Spring Bean들은 눈에보이지 않는 메모리에 올라가 있으니 확인할 방법이 없잖아요 그럴때는 DefaultListableBeanFactory.class를 주입받아서 사용해 볼께요. 근데 저희는 DefaultListableBeanFactory.class를 등록한 적이 없는데요? 라고 생각하실 수 도 있는데 Spring에서 기본적으로 초기화되는 Bean들은 여러개가 있어요
- SpringDemoApplicationTests.class
package com.sup2is.demo;

import org.junit.Test;

import org.junit.runner.RunWith;
import org.springframework.beans.factory.annotation.Autowired;
import org.springframework.beans.factory.support.DefaultListableBeanFactory;
import org.springframework.boot.test.context.SpringBootTest;
import org.springframework.test.context.junit4.SpringRunner;

@RunWith(SpringRunner.class)
@SpringBootTest
public class SpringDemoApplicationTests {

    //Spring Bean에 등록된것들중 동일한 타입이 있으면 자동으로 주입해주는 어노테이션
	@Autowired
	private DefaultListableBeanFactory beanFactory;

	@Test
	public void beanCheckTest() {
		for(String name : beanFactory.getBeanDefinitionNames()) {
			System.out.println("Bean name : " + beanFactory.getBean(name).getClass().getName());
		}
	}

}
- console
Bean name : org.springframework.context.event.EventListenerMethodProcessor
Bean name : org.springframework.context.event.DefaultEventListenerFactory
Bean name : com.sup2is.demo.SpringDemoApplication$$EnhancerBySpringCGLIB$$ab4a679f
Bean name : org.springframework.boot.type.classreading.ConcurrentReferenceCachingMetadataReaderFactory
Bean name : com.sup2is.demo.AppConfigration$$EnhancerBySpringCGLIB$$a0500705
Bean name : com.sup2is.demo.FooComponentA
Bean name : com.sup2is.demo.FooComponentB
Bean name : com.sup2is.demo.FooComponentC
...
저희가 xml과 JavaConfig로 등록한 FooComponent들이 Spring Bean에 등록된걸 확인하실 수 있습니다.
아까 xml로 name값을 초기화 했던 FooComponentC의 printName 메서드도 한번 확인해볼께요
- SpringDemoApplicationTests.class
package com.sup2is.demo;

import org.junit.Test;

import org.junit.runner.RunWith;
import org.springframework.beans.factory.annotation.Autowired;
import org.springframework.beans.factory.support.DefaultListableBeanFactory;
import org.springframework.boot.test.context.SpringBootTest;
import org.springframework.test.context.junit4.SpringRunner;

@RunWith(SpringRunner.class)
@SpringBootTest
public class SpringDemoApplicationTests {

	@Autowired
	private FooComponentC fooComponentC;

	@Test
	public void fooComponentCTest() {
		fooComponentC.printName();
	}

}
- console
2019-03-21 11:27:18.925  INFO 16220 --- [           main] c.s.demo.SpringDemoApplicationTests      : Started SpringDemoApplicationTests in 2.36 seconds (JVM running for 3.5)
my name is sup2is demo project
2019-03-21 11:27:19.181  INFO 16220 --- [       Thread-2] o.s.s.concurrent.ThreadPoolTaskExecutor  : Shutting down ExecutorService 'applicationTaskExecutor'
...
“my name is sup2is demo project” 가 콘솔에 잘 찍히는걸 확인하실 수 있죠?
이렇게 Spring Container에 올라간 Bean들은 따로 scope를 정해주지 않는 이상 singleton으로 메모리에 올라가게 되는데 sington은 나중에 알아볼께요 .. 허허
포스팅은 여기까지 하겠습니다. 모든예제는 제 github에서 확인하실 수 있습니다.
예제 : https://github.com/sup2is/spring-example/tree/master/springframework-1/src
다음시간에는 AOP 관련해서 알아볼께요.
피드백은 언제나 환영입니다 :)
퍼가실때는 링크와 출처를 반드시 명시해주세요. 감사합니다.
출처 : https://en.wikipedia.org/wiki/Spring_Framework
출처 : https://docs.spring.io/spring/docs/3.0.x/spring-framework-reference/html/overview.html
출처 : https://docs.spring.io/spring-framework/docs/current/spring-framework-reference/core.html
원본 : https://sup2is.github.io/spring-framework-1/
Spring Framework #1 DI/IoC편
스프링이란?
sup2is.github.io
'spring' 카테고리의 다른 글
| [Spring] Spring Framework #3 Test편 (0) | 2019.06.05 |
|---|---|
| [Spring] Spring Framework #2 AOP편 (0) | 2019.06.05 |
| [Spring] Enum에서 @Autowired로 Bean 주입 받기 (0) | 2019.04.26 |
| [Spring Boot]Spring Boot 에서 외부 library 추가하고 spring-boot-maven-plugin 로 Build 하기 (2) | 2019.04.10 |
| [Spring] Spring quartz 와 @Autowired (2) | 2019.03.11 |